
This weekend was more productive than I expected, starting with our neighborhood-wide garage sale. We decided to participate in an attempt to clean out the spare bedroom to make room for baby and we were surprised at how well we did!
There were definitely a few garage sale crazies, like the one that came with a flashlight and was snooping around our stuff as we were setting up at 6:30 AM... Eek. Also, I'm pretty sure it made my husband's day when 3 people came up and asked if we were selling this console table! Considering this was his first project since we made cornhole boards, I think that's quite a compliment and he totally deserves it!
The supplies for this project cost us about $75. Not bad for a 6 foot long console table.

I thought I'd share a few of the steps via pictures since the original instructions are a bit lacking in that department. My husband followed the Ana White Rustic X Console Table plans, so make sure to check there for the shopping and cut list plus additional directions.
Tools we used:
Mini Kreg Jig Kit (takes a bit of practice to learn how to use, but for $20 it was the cheapest Kreg Jig option and worked just fine for this project)
Drill
Power Sander
2 boxes of 2 1/2 inch pocket hole screws
1 box of 1 1/4 inch pocket hole screws
We had Lowes cut all of the pieces for us, which took a little while but the nice man helping us didn't mind and it saved us a ton of work!
Once you get the hang of your Kreg jig, you basically want to make pocket holes on all of your wood pieces before attaching them with pocket hole screws. Make the frames first.

Then drill pocket holes into the two 1x12 boards. My husband made a lot of them... I don't think this many were necessary but hey, they are really secure!

Attach the other side of the frame to the shelves. Then drill more pocket holes to the remaining 2x4 and 2x2 pieces (these were supposed to be cut at 11 1/4" but for some reason ours were tight and had to be sanded down to about 11").
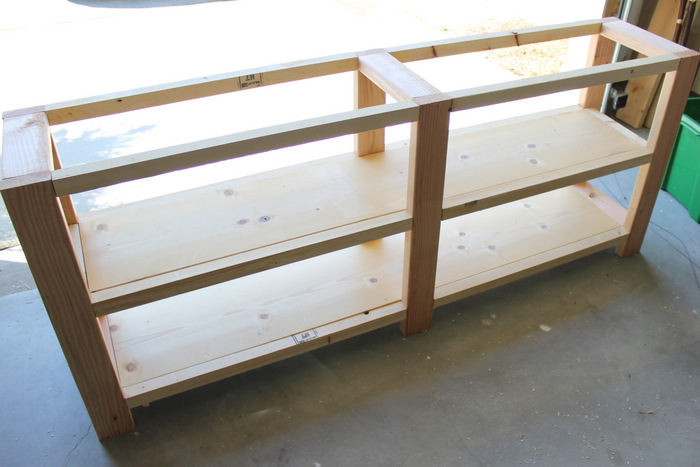
Drill more pocket holes (getting tired of those yet?) on the top pieces of the frame, facing upwards, to secure the table top.

My husband did one coat of Minxwax Stain in Dark Walnut and 2 coats of polycrylic on the whole piece.

Since we're beginners at this, we don't have all the tools required so we left out the "x" part on the ends of this table. We added some corner brackets, which we bought in a pack of 4 for only $4 at Lowes, and I spray painted them.


I'm so proud of my husband, the table looks amazing in our hallway! Though I think he is a bit worried I'll give him more projects like this now that I know he's got some talent in the construction department.

After finishing our projects this weekend, I treated myself to a few pumpkins and finally put more Fall decor up. Will share more of this gorgeous table all styled up for Fall later this week!


This turned out great! I like how you added the corner brackets to the piece, makes it look a little bit more unique :)
ReplyDeleteI'm so impressed! Absolutely gorgeous!
ReplyDeleteYour table looks awesome! And great for the price! I am jealous of your vacation in Florida!
ReplyDeletewww.madeintheshadeblog.com
Wow! We have been dying to buy something like this. Maybe we will just make it!!!
ReplyDeleteThis turned out amazing!! It looks very professional. This may be the next project for my Husband.
ReplyDeleteIt looks great! Way to go husband!!
ReplyDeleteThis is exactly what I am looking for for under our gallery wall. Thank you for sharing - I will be stealing this idea! :)
ReplyDeleteIt's really beautiful. I'd love it in my house!
ReplyDelete~Ashley @ A Cute Angle
acutelifestyle.blogspot.com
LOVE this!! It turned out amazing! I'm going to have to pin this to try one day.
ReplyDelete<3, Pamela
sequinsandseabreezes.blogspot.com
Holy cow, you guys did AWESOME!
ReplyDeleteLove it!!
ReplyDeletedude! that looks amazing!
ReplyDeleteThat looks amazing!! Job well done guys!!
ReplyDeleteSteve is the man! What a great table. Love how it turned out with the photo collage :)
ReplyDeleteLove, love, love!!! This turned out so great! The stain is so perfect :)
ReplyDeleteDefinitely adding this to the list of DIY projects I want my husband to do, ha! I love the stain.. can't wait to see it all decorated for fall! Happy Monday :)
ReplyDeleteWow that table looks awesome! You need to get Steve to make y'all a crib and a changing table now!
ReplyDeleteWow, that looks great!!! you didn't sell it, right???
ReplyDeleteOk, seriously??? You guys are amazing. That looks incredible. I'm so impressed with good DIY projects. I love the way it turned out and your awesome gallery wall above it!!
ReplyDeleteWhat an awesome project! I am totally jealous of your DIY skills. :)
ReplyDeleteI love the metal corner brackets that you added, looks great!!
ReplyDeleteI am impressed! I'd be super proud of my husband, too!
ReplyDeleteLooks amazing! Might have to forward this blog post to Cameron...
ReplyDeleteThat table looks amazing! Your husband did a great job on it! I think you should totally give him more projects now ;)
ReplyDeleteThis is awesome, we have a console table that is not very functional. I need more shelving - may have to show the husband this and add it to his list of projects!
ReplyDeleteI can't believe your husband built that!! Mine can barely hang a picture on the wall!! So so impressed! If I were you I would have a list 100 projects long for him to do.
ReplyDelete