
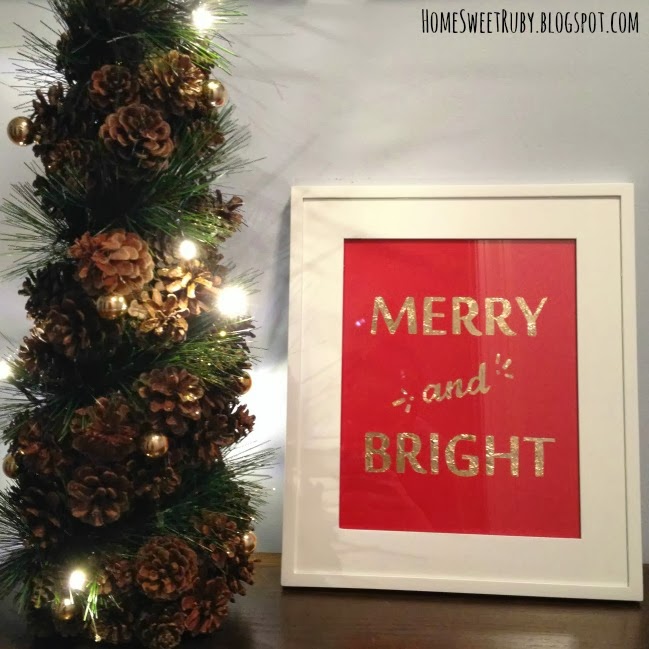
I don't know about you all, but I'm loving all of the gold foil prints you can find on Etsy. The problem is, I'm not spending $20 or more on an art print, at least not now. Call me cheap or blame it on paying for Christmas gifts and a Europe trip... either way I found this tutorial and decided to give it a shot.

I'm happy with the way it turned out considering I also don't have $300 for a silhouette machine. That would have made this much, much easier. It's actually possible to get the gold more smooth than mine looks, but my hands were getting sticky and I figured that would do! Also, with this method you are limited as to what kind of font to use and your design so eventually I may end up purchasing a gold print after the holidays.
Without counting the picture frame with mat, this project cost me $4.35 and I have tons of gold leafing paper left for more projects.
What you need:
2 Pieces of Cardstock Paper: $0.75 (One piece will be covered in gold foil so it doesn't matter what color it is)
Exacto Knife: Owned (You can get these for a few bucks at any craft store or use a box cutter if you're desperate, just be careful!)
Cardboard: Owned, this is only used to protect your surface while cutting the paper
Gold Leafing: $3.60 (with 40% off coupon at Hobby Lobby)
Spray Adhesive: Owned

First print your design on your cardstock. I used a thick, but relatively simple font from Word. You don't want anything too thin or cursive because if you're like me, you'll totally lose your patience when cutting it out. I changed my font color so it was a light grey outline and it wouldn't be too noticeable if my cutting wasn't great. Which, in case you're wondering, I'm terrible at regardless of which tool I use!
Cut out your letters with the exacto knife, making sure to save the little pieces of paper from the inside of certain letters, like the "R" in my project.

This is where I stopped taking photos because I figured the spray adhesive and my camera were not a good combination! It's pretty self explanatory though...
Once you have all of your letters cut out, lightly spray your other sheet of cardstock with spray adhesive. Be careful with the gold foil, it will stick all over your hands and will break apart easily. I used the paper sheets that come in between each leafing sheet to press it to the sticky cardstock.
Spray the back of the cardstock with the text, and stick it to the paper with the leafing.
Finally, spray the back of the pieces from your letters and stick those in place. You may be able to use some other kraft glue, but I was too lazy to get it out and just dealt with the stickiness of these itty, bity pieces of paper. A tweezer helped me get them in the right spot.
Put in your frame and display. Festive!
Anyone else loving the gold prints out there lately?


You're so talented/ creative! Love how this turned out!! Great idea - thanks for sharing!
ReplyDeleteAw thank you! It was pretty easy, just need some patience cutting the letters out!
DeleteWhat a great and simple idea! That gold paper is fabulous!
ReplyDeleteThank you! :)
DeleteAWESOME!!!!!!!!!!!
ReplyDeleteThanks Courtney! Nothing better than a cheap and festive project :)
DeleteI love this!! So easy and looks great!
ReplyDeleteOh! I love this!!
ReplyDeleteLooks awesome!
ReplyDeleteWhoa...amazing! This will be added to my to do list for next week!
ReplyDeleteSo adorable, love this!
ReplyDeleteThank you!! :)
DeleteI love this!!
ReplyDeleteperfection! i might just have to steal this idea...
ReplyDeleteThis looks fantastic! You don't have to buy these, you can do it all on your own!
ReplyDeleteThanks Jodi :)
DeleteI would not have the patience to do that! I think I would have torn the paper in a quick second!
ReplyDeleteTotally doing this for Christmas - what a creative idea! I love love love the gold prints and I have one that says "hey y'all" in my living room but this would be perfect in the entryway!
ReplyDeleteOh I've seen that "Hey Y'all print.. so cute!! Definitely try it out, I don't think my pictures showed how pretty it is in person!
DeleteIt turned out adorable!!! I love your DIY print! :-)
ReplyDeleteI love this! I really need to stop spending money on things I can do myself so I'm totally going to try this project!
ReplyDeleteI can't get over how expensive some of these prints are right now! I love your diy version and totally want to try my own!
ReplyDeleteSheer and utter brilliance! Why I never thought of doing this I will never know, but I am stealing your idea and making this!
ReplyDeleteThanks Breanna! :) Definitely try it out, I think its prettier in person and you can't beat the cost!
DeleteLove this project! I'm swooning over everything goldfoil right now. I may be using my next nap time to break this bad boy out! Stopping by from 5 on Friday.
ReplyDeleteThat turned out so amazing! I may have to try it :)
ReplyDelete