Boo!

Happy Halloween all!! I am so excited its Halloween, but it's not just because of the candy. The next three months are full of festiveness, family, friends, and love. Oh and I also get older in January. Normally I wouldn't be too excited about that one but I think my 27th year of life is going to be pretty awesome starting with our Europe trip!

Last night I finally carved our pumpkins! I look forward to carving pumpkins and roasting the seeds every year. Usually I try to do some difficult designs but this year I went a little easier on myself. The hubs carved the pumpkin on the right using our drill.. he did so good! I love that it projects the light on the house like a disco ball!

Last year I carved a Ruby look-a-like! This was probably my favorite out of all of the pumpkins I've carved. You can visit here for 26 free patterns of all different types of breeds!

I know, we reached a new level of obsession with our pup when we carved this pumpkin!

So far this week we watched Sleepy Hollow, the Goonies, Beetlejuice, and the Toy Story Halloween special... don't judge on that last one. Tonight we are following tradition by watching Hocus Pocus (again) while handing out candy to the kiddos. We've heard that we get a lot of trick-or-treaters in our new neighborhood so I'm starting to think we should have refrained from being fat asses and eating half of our candy stash.

My Halloween costume might make an appearance on Instagram tonight... I know you've all been waiting on pins and needles to see it! ha! Until then, here is Ruby doing her hula thing!


We actually entered this photo into a contest with our vet, she is only a few votes away from winning... I don't even know what the prize is but who doesn't love winning free things?!

Speaking of winning, don't forget to enter for the Rifle Paper Co. giveaway!

Anyone handing out candy to trick-or-treaters tonight or have fun plans? You better believe we'll be that couple giving out candy with a pumpkin beer in our hand!

19

Rifle Paper Co. Giveaway!

With Thanksgiving around the corner, I've been brainstorming for ways to thank all of my readers for your comments and support after starting this little blog a few months ago. Even if you don't comment, the fact that you follow Home Sweet Ruby and read my rambling posts means the world to me! I honestly never thought I'd have a single reader... besides my Mom! 

So as a thank you for being awesome, I've got some fun goodies courtesy of Rifle Paper Company to giveaway to a lucky reader!

I'm pretty much obsessed with Rifle Paper Company, and would probably buy every single item if I could. I have already hinted to my husband that their products would be great stocking stuffers. Is it weird to have stationary on your Christmas wish list?

My favorite item?

Affenpinscher Card
Hello, the pup on this card looks exactly like Ruby! I'm also currently obsessed with the Rosalie Notepad, Botanical Journal, Floral Monogram Card, and Floral Foil Birthday Card.. just to name a few!

There are also have some adorable holiday products, including these Thanksgiving cards and place cards that make up today's giveaway!


How cute are these?! They are perfect for sending to the other side of the family if you're rotating holidays like we are. I'm also pretty sure my family members would mess with me and move around the place cards, but you know I'd totally be using them if we were hosting.

Make sure to enter below, good luck, and THANK YOU! Giveaway ends at midnight on November 7th and winner will be notified via email.

a Rafflecopter giveaway


This giveaway was in partnership with Rifle Paper Company. I was not compensated in any way and all opinions are my own.

9

Mini Weekend Recap + Pumpkin Spice Gobs

This weekend I experienced the hangover that no amount of greasy food, aspirin, or sleep could cure. Between cooking, cleaning, being the designated driver for the boys on Friday, and then playing one drinking game after another on Saturday, I'm finally able to function today!

On Friday night we started at a bar/nightclub/old church (weird combination, right?) and I don't think I've ever felt so old at a bar until then. You know what makes feeling like the oldest person at the bar even worse? Being 100 percent sober. ha! I did get a few good laughs at some of the inebriated college students dressed in their Halloween costumes though. My favorite was a really tall King Kong trying to shove bananas in a girl's face. Bet that worked out really well for him...

I also admit that I was terrible at taking photos of our weekend, including the intense giant jenga match that occurred in the dark, after several rounds of beer pong/flip cup. Ew, my stomach just curled thinking about it.
 
One thing we did enjoy this weekend.... Pumpkin Spice Gobs!

These are great for Halloween or Thanksgiving, and are especially cute if you use a pumpkin whoopie pie pan like this one! Mine is from Crate & Barrel but its currently sold out. These gobs are super easy to make, you basically just put all of the ingredients into a bowl and mix!


Pumpkin Spice Gobs
Recipe adapted from Better Homes and Gardens

Gob Ingredients:
1 cup Canned Pumpkin Puree
1/3 cup Butter, softened
1 package of Spice Cake Mix
2 Eggs
1/2 cup Milk


1. Preheat your oven to 375 degrees and line a cookie sheet with parchment paper. Grease the pan if using a whoopie pie pan.

2. In a large bowl, beat pumpkin puree and softened butter with mixer on medium speed until smooth.

3. Add cake mix, eggs, and milk to pumpkin mixture and beat on low speed until combined, then on medium speed for 1 to 2 minutes.

4. Drop batter onto parchment paper or on whoopie pie pan by the tablespoon. Make sure to leave about 2 inches between each gob and bake for 15 minutes, or until edges are lightly browned.

The pumpkins use much more batter than regular gobs


5. Place gobs on cooling racks until filling is complete and gobs are cool.


Filling Ingredients:
1/2 cup Butter, softened
1 (8 oz.) package Cream Cheese, softened
2 cups Powdered Sugar, sifted
1/2 (7 oz.) jar of Marshmallow Creme
1 tsp. Vanilla Extract
1/2 tsp. Cinnamon
1/2 tsp. Pumpkin Pie Spice


1. Beat together butter and cream cheese until smooth.

2. Add powdered sugar, marshmallow creme, vanilla, cinnamon, and pumpkin pie spice. Beat until combined, then refridgerate for at least 1 hour.

3. Match up like-sized gobs and place about one tablespoon of filling between each gob.


As far as the filling goes, this is a little more soft than I'd like for icing. You have to keep these gobs stored in the refrigerator until ready to serve so that the filling doesn't get too warm. You could also try a regular cream cheese icing recipe, which is what I might do next time!

Has anyone tried these gobs before? A lot of people I've talked to have never heard of gobs or whoopie pies before... maybe its a Northern thing? I hope you all had a great weekend!

Linking up with Ashley and Jessica today!


17

Friday Five!

This week has gone by so quick and its even harder to believe this is the last weekend of my favorite month. Where does the time go!? After Halloween I'm officially allowing myself a little more Christmas chatter, but for now I'm totally relishing the beautiful cool weather we've been getting! Sorry to those up North where its dropping suddenly into the 20-30s... eeks!

I'm linking up again with Christina, Darci, April and Natasha!

ONE. Man-Approved Foods.

I mentioned earlier this week that two of my husband's friends are in town visiting us, which means Ruby and I are outnumbered. I love hosting and trying new recipes though, so the menu this weekend consists of a lot of man-approved foods, with a common theme of bacon and carbs. Gotta soak up all that Liquid Apple Pie, right? This morning I'm making Bacon Egg Cups, mostly because I've been wanting to see how these come out! I'm also planning to make some pumpkin french toast again tomorrow, before whipping up some bacon-wrapped hot dog bites and buffalo chicken dip.

TWO. Shopping.

After getting the boys set up with finger foods for what I assume will be a full day of drinking and college football, I'm heading to do some shopping. J. Crew Factory has another sale and I have to exchange some jeans anyway so... why not? Also, there is a Home Goods and Marshalls combined into one giant, amazing store and a Hobby Lobby not far from there... trouble!

THREE. Dessert.


I made some pumpkin spice gobs this week. Don't worry, recipe to come next week! I'm warning you though, they're dangerously good (and adorable if I do say so myself!)

FOUR. Halloween Candy.

Now I know why you should never buy candy until a couple days before Halloween. I know we haven't had any trick-or-treaters yet, but our stash keeps mysteriously disappearing...

FIVE. Giveaways.

I'm working on a couple great giveaways for you all in the works, so stay tuned next week!

Sorry for the lack of photos today! I hope you all have a fabulous Fall weekend!

13

Thirsty Thursday: Liquid Apple Pie

I could have also titled this post, "What to do at Lowes to have the whole store asking you what you are building" because if you follow me on Instagram, you know that last night I purchased some lumber and had them cut all of it to 10.5" pieces. 54 of them to be exact.

Yep, I was that girl in Lowes who all of the male employees stare at, wondering if she knows what the heck she is doing. The kid cutting the wood for me told me cuts were $5 each... ha! (They didn't charge a thing for the cuts, maybe it was because I was wearing my very best yoga pants??) Then 3 more employees came back to see what all the fuss was about. And again, as I was pushing my little buggy up to the front to pay, I had 3 more Lowes employees coming out of the woodwork asking me what I was building.

Giant Jenga, of course! Its so easy to make a set, and a great drinking game. I'm sure I'll have more photos of this in action this weekend, but all you need is 6 pieces of 2x4x8 lumber cut into 10.5" pieces. When you get home, sand the pieces so you don't get any splinters and if you want, you can spray paint the wood.

When playing, make sure all pets are inside the house. Also, if you're really drunk clumsy, you might want a helmet.

Finally, to the real point of this post...

Because you probably haven't heard me talk about wine, pumpkin beer, pudding shots or sangria enough this fall... I'm bringing you one of my favorite boozy concoctions today. Just in time for your Halloween parties! I guess we're trying to soak in all of the boozy fun we can before we get old and kids force us grow up a little.

Side note... Even though we had an open bar at our wedding, we had two guests with Liquid Apple Pie in mason jars, sharing it with everyone. Let me tell you, those two guests were easily some of the favorites at our wedding! ha!

Don't be intimidated by the grain alcohol. I absolutely promise you that you will never know its in there! However, you can still get pretty toasted so be responsible! There I got my disclaimer in there, right? Anyways...


Ingredients:
1 Gallon of Apple Juice
1/2 Gallon of Apple Cider
4-6 Cinnamon Sticks
1 Liter of Everclear

I cut this recipe in half because we'll only have 4 people here this weekend and already have a ton of beer! I'm sure you can swap out the grain alcohol for a different liquor, or use 151 if your state doesn't sell Everclear.

This is one of the easiest drinks to make. In a large pot on your stove top, simmer the apple juice, apple cider, and cinnamon sticks for two hours (do not boil). Remove from heat and allow to cool. Then, strain out the cinnamon sticks and add the Everclear.


It's absolutely essential you put the Liquid Apple Pie in a mason jar, because its cute and keeps it sealed. We couldn't fit all of it into just one mason jar, so the rest went back into the Apple Juice container. You know, just keepin' it classy.

Refrigerate until ready to serve. Hint: Top a shot of this drink with whipped cream. YUM!

Has anyone had this drink before or have any other concoctions planned for Halloween festivities? I saw these shooters which would be SO fun for a party!

14

"Laurel" Love

My newest obsession is the laurel wreath motif for all things home decor. I'm not sure why, but I can't get enough of it! Lately the motif has been popping up everywhere, on pillows, chalkboards, stationary, and my personal favorite, on holiday decor. Here are some of my favorite laurel wreath finds from some fabulous Etsy shops!


The laurel wreath, which is made with interlocking branches and bay leaves, is a symbol of victory. To me it just looks classic and traditional, especially when paired with a monogram. Doesn't everything get better with monograms?! You better believe I'm buying that pillow with red embroidery for our Christmas decor! So festive!

Does anyone share my love for the laurel wreath motif?! I know I've got some monogram lovers out there!

13

Pumpkin Beer Snob

I honestly can't help eating and drinking pumpkin-flavored foods this time of year. Hopefully y'all feel the same way, but if not, just go with it today.

Our Saturday started with some pumpkin french toast, which was absolutely delicious! If you haven't noticed on Instagram, I've been trying out different pumpkin breakfast recipes. We've got two of my husband's friends coming to visit this week and I figure pancakes and french toast are easy to make in large quantities.

Recipe from Emily Bites

After watching the Gators lose (boo!) and running errands in an attempt to get our master bedroom completed, my husband and I dropped by a local brewhouse for their Pumpkinfest. I'm sure none of you are surprised that as soon as I heard about this event I knew we had to go, so I managed to talk my husband into going before the big Clemson/Florida State game started.

This place was great, no televisions so it was just us, our conversations, beer, and the annoying 21 year-old idiot in the opposite corner with his buddies. I can laugh at him now that I'm much older and wiser... ha!


We got right into it with our pumpkin beer taste testing. I like to think I've tried all of the pumpkin beers out there via the selection at World Market but I was totally wrong! Look at this list of beers they had at the brewhouse! Heaven!


I don't know all of the snooty beer tasting terms but my favorites were Thomas Creek Pumpkin Ale and Southern Tier Pumpking. Both of these happen to be pretty high in alcohol content, but you wouldn't know it because the pumpkin-flavoring and spices hide it pretty well. The Thomas Creek smells amazing. RJ Rockers and Dogfish Head were good, but a little plain compared to the others. The only one I wasn't a fan of was the Red Hook because I don't like porters.

A friend of mine said to try the Southern Tier with crushed honey graham cracker and cinnamon on the rim, which sounds amazing and is definitely on the to-do list!

After we did the taste-testing, the hubs ordered an Octoberfest beer and I went straight for the Timmermans Pumpkin Lambicus, which came with a free glass. I'm a sucker for free glasses so I ordered without realizing this was a 25-ounce beer I was about to get.


I felt like I was drinking beer out of a wine glass! The Timmermans was really good, but it had more of an apple spice taste than pumpkin. Maybe its because its a lambic, but it didn't seem like I was drinking beer. This might be a good option for anyone who doesn't like beer but wants to try something pumpkin-flavored.

Overall, my go-to pumpkin beers would have to be Saranac Pumpkin Ale, Shipyard Pumpkinhead Ale, and Thomas Creek. Anyone have any other favorite pumpkin or Octoberfest beers?

I hope you all had a great Fall weekend! I can't believe we're nearing the end of October already!

13

Hellllo Friday

Friday could not have soon enough this week! Between attempting to work out again and fighting off a cold, its been a little exhausting around here! I'm hoping I can kick that cold out of my system this weekend with some excessive pumpkin beer drinking at a local brewhouse. That's always a good cure, right?

Of course I'm linking up again today with the fabulous ladies of Carolina Charm, A. Liz Adventures, the Good Life, and Hello Happiness for some Friday goodness!


ONE: Stellar Dance Moves

I was in the car this week and the radio stations were annoying me so I busted out my old collection of CDs from the glove compartment. Yes, you know those things called compact discs that came out eons ago? Well, I don't know when I went through the rap stage but the CD included "Get Low," "Snap Yo Fingers," and "This is Why I'm Hot" to name a few. Just so you know, I will forever dance like a fool when any and all of said musical selections are played. Here is a little idea at what my dance moves look like via one of an iphone at our wedding...  You're welcome.


TWO: Halloween Tombstones


We had some leftover plywood and my husband decided he wanted to use it to make some Halloween decor for the front yard. We settled on making tombstones. I didn't want responsibility for the project but I did help a little because he kept telling me that he is the "idea man" and I'm the "implementer." When he told me I couldn't put the Sanderson Sisters' names on the epitaph he was on his own. For two people that don't typically decorate for Halloween and are on a budget, its not too shabby.

THREE: Recent Purchases

I mentioned on Tuesday that I made some purchases with the Columbus Day sales, but the biggest (and smallest) purchases were flights! I used some rewards points combined with a Southwest sale and got a flight for $5 to DC in December. FIVE BUCKS! We also bought our flights to Europe and renewed our passports. Did you all know its $110 fee even for a renewal with your new last name? Boo.

Another purchase I'm planning:
Via TShirtMarket on Etsy
Loving pretty much everything about this tee! And I'm already getting into Christmas stuff even though I'm trying really hard to hold back!

FOUR: Healthy Habit Update

Last week you all talked me through my craziness when I couldn't swallow multivitamins and my workout plans failed. I am happy to report that I am eating my gummy vitamins, back to working out, and eating healthier... as in... less carbs. Success! I may or may not have wanted to puke on the treadmill the first and second day though. Anyone else trying to get back into healthy habits?

FIVE: Goodbye shorts, hello sweaters

Even though we have some days that are still a bit warm, I decided to unpack all of my sweaters and put away my summery shirts and shorts. I think I may have enough sweaters now, but just in case I'm really in the need for another, I've got this one with elbow pads on my Christmas list. Anyone else rotating your closet yet? Or am I behind on that one?!

I hope you all have a fabulous weekend! Only one more of them in October after this!

18

DIY Upholstered Headboard

First, thank you all for your comments on the progress we've made with our master bedroom redo! I say that like my husband was all about this project... ha! I actually think he is coming around to the idea of making things ourselves though, he was pretty shocked when I told him this headboard cost a grand total of $110! And brace yourselves because this post is picture heavy.

You can see the updated tutorial with much prettier photos and a diagram of the headboard dimensions here!


And now back to the old iPhone photos... 

I had very specific requirements in mind for our headboard, which is why I ultimately decided to forgo the logical decision of purchasing a headboard and attempting to make one on my own.  Of course, as an overachiever a beginner DIY-er, I had to challenge myself. You can see my inspiration here, but the one headboard that really stuck with me is the Z Gallerie 'Grayson Bed' which retails at about $1,200.

Obviously that was not happening. I didn't get the bed frame I wanted but I'm okay with that because I managed to tick all of my other boxes for a headboard:
  1. Grey, velvet-like fabric
  2. Taller than most headboards so it will be noticed with all of our pillows arranged
  3. Nailhead trim
  4. Fabric all the way down the sides, onto the legs of the frame so that if you happen to see the side, it won't look ugly
  5. Make sure the legs can be screwed into the bed frame if needed (we haven't done that yet, it seems to be holding well with the frame pushed up against it)
  6. For the love of God, it cannot look homemade
Note: If you are considering making your own headboard, please save yourself the headaches, cursing, and staple gun injuries by choosing a more simple shape or even avoiding velvet for your fabric. More on that later...

There are tons and tons of upholstered headboard tutorials out there, but this tutorial from Sara at Running from the Law was by far the best. She has lots of great pictures and seems better than me at using the jig saw, so feel free to check that out if this tutorial blows. ha!

What you need:

1 (23/32 x 4 x 8) piece of Plywood, uncut: $25
1 (1 x 6 x 12) piece of lumber, we used Top Choice from Lowes and had it cut in half: $12
Staple Gun: Own
1 pack of 3/8" (10mm) Staples: Own
Hi-Loft Batting in Twin Size: $16 (with coupon at Joann's)
Twin Foam Mattress Pad: $10 from Walmart
1 50-pack of 1 1/4" Wood Screws: $6
Spray Adhesive: $5 (I used Aleene's Tacky Spray from Joann's with a coup)
Nail Head Trim: $11 (with coupon at Joann's)
Rubber Mallet: Own (randomly found this in my car's emergency kit?)
Jig Saw: Borrowed
Circular Saw: Didn't actually use one, but if you have one it would be helpful
Fabric: $25 (I used one 55" x 98" "Sanela" Ikea curtain panel)

Total: $110 (or $118 if you count the 2 x 6 x 12 lumber the guys talked me into buying because they weren't understanding my design plan... don't be intimidated at Lowes, ladies!)

First we cut the plywood down to the size I wanted it with our Queen bed, which was 63" wide by 65" tall (at the tallest point).

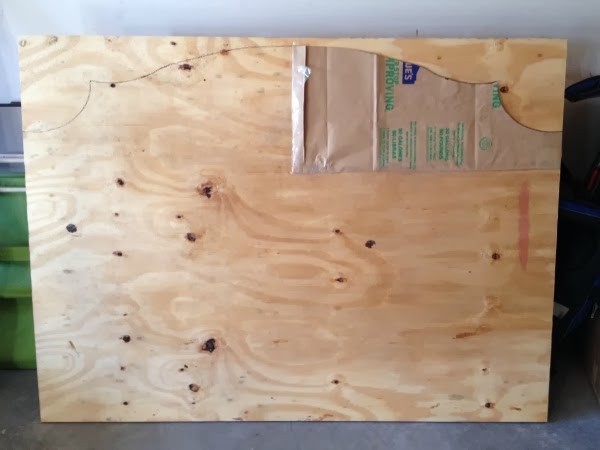
Next, I already had the shape of my headboard in mind so we used a paper bag to make a stencil. I traced the left side, then flipped over the stencil and did the same on the right side. You could also use a compass but my shape was a bit too advanced for a compass, of course!


Cut your headboard shape, and remember... safety first!

He's going to hate me for posting that picture, but I did warn him. Also, I forgot to take pictures of us cutting the headboard to shape...  must have been distracted from my husband's sexiness in those glasses....

Because I knew I would be upholstering this and the nailheads would need something to hammer into, I decided to follow Sara's tutorial and frame the headboard with the piece of lumber (as the legs) and the left over plywood for the top of the headboard and leg reinforcements. Does that even make sense?! Your legs can be as long as you want them to be, but ours stick out 21 inches from the bottom of the headboard.

Please ignore the mess in our garage!
That part was tricky because the leftover plywood wasn't the length of the headboard. We ended up having to piece it together and even though there are a few tiny gaps, those won't matter in the long run.

We then attached the legs and the frame pieces to the plywood with the wood screws, about every 6-8 inches.


Progress!


You can see in this photo that the legs have extra pieces of plywood on the backside so that everything is flush with the headboard. We decided not to trim them to match the 1 x 6, too much effort and no one will know once you upholster it. 

Next, cut your foam padding to fit within the frame you just completed before spraying the plywood with adhesive and sticking the foam to the board.


Easy peasy. Next I put the batting underneath of the headboard and started stapling.

I go a little overboard with the staple gun, y'all. It totally wasn't necessary to use an entire pack of staples but I did and I'm not ashamed of it. The curves of the headboard were a bitch and the only solution I had after finishing a bottle of wine was going staple-crazy. The last thing I wanted was to finally reveal the headboard I spent hours on and it have a bunch of puckering and bunching.

Before moving on, trim all of the excess batting.


Once I got to the actual fabric, it was basically the same process as the batting. However, this velvet fabric was out to get me and I am so thankful Steve helped because my hand was sore from stapling at this point. It also helps to have one person pulling the fabric, and the other stapling.

I worked my way around the headboard, only doing a few staples on the top, then bottom, then the sides. I continued this process, saving the curves and most of the top of the headboard for last.

It helps to cut the fabric in 'V' shapes in the curved portions to minimize puckering. But let me tell you, this fabric refused to cooperate. I almost cut it too far to where you would see it ripping onto the side of the headboard. AH!

Terrible, terrible curves! At least we won't see the back!
I used leftover batting and fabric for the legs and did those the same exact way.

It was getting dark at this point

Applying the nailhead trim was actually easier than I imagined. You only have to nail every 5th nail into the wood and its flexible enough that you can bend it however you need it for the curved portions. The trick is keeping it straight, so I used my leveler because it was the perfect width from the edge of the headboard.


My first attempt at keeping the nailhead trim straight was using painter's tape, but when I pulled it off some of my super high quality Ikea velvet came out. I panicked at the time, but you don't notice it now unless you look really close.

I actually got into a rhythm when doing the nailhead trim and it only took about 20 minutes.

Finally, sit your headboard up on its legs and admire your work! Then, pop open another bottle of wine or some pumpkin beer and put your feet up!


For more of the finished product, visit here. I've actually gotten a lot accomplished since then so hopefully the final reveal will be soon!

Do any of you think you'll give it a shot? If you have any questions, let me know! I know it looks a bit complicated but its totally doable with some patience and in my case, wine. 


Savvy Southern Style
29
Powered by Blogger.