Showing posts with label Tutorials. Show all posts

DIY :: Restoration Hardware-Inspired Baby Mobile

I hope you all had a fun and festive New Years Eve! Our weekend was very laid back and yet somehow I'm still tired! Guess that comes with the territory. We did get a lot of work done on the nursery so today I wanted to share one of my favorite parts... the mobile!

I have been so incredibly picky throughout this nursery planning process that I've basically forced myself into DIY projects, and this baby mobile is one of them. And though it has been a slight pain for this perfectionist to balance this thing, I'm so happy with the way it turned out!


Initially I had my eye on Restoration Hardware's Wool Felt Night Sky Mobile, and though it was a reasonable price, tacking on shipping for something I felt like I could make myself put it over budget.

Then I remembered a friend of mine who made a wool felted bear mobile for her sweet little babe's nursery (see the amazing tutorial here, she is seriously SO talented!) and it gave me the idea to go with the wool felted stars. I ended up ordering the stars from the Etsy shop Handmade Only, which specifically sells felted wool shapes that are so cute and saved me a ton of work!


What you will need:
Wool Felted Shapes (I ordered 15 stars total, but used only 13, in the colors light grey, white, and french blue)
1 Dowel Rod (the thinnest you can get, found in the wood section of craft stores)
Ceiling Hook
Extra Strength Thread + Needle
Hot Glue Gun

One. Prep the dowel rods + Plan the star placement
 
I used a box cutter to cut the dowel rod into pieces. The longest is 12" and the other 3 pieces are 6" each. Spray paint the rods if you don't want the natural wood color.

Once you've got your dowel rods cut, plan how you want the mobile to look. I added more stars after taking this photo.

Three. Thread the wool stars

Fabric swatch is there so you can see better how I tied the string
Using one long piece of thread (do not double it as if you were sewing), tie 2 or 3 knots on one end and tie the other end to your needle. The knot will keep your wool star from sliding off. Thread each star, or group of stars.

Four. Tie the thread + stars onto dowel rods

The biggest pain with this project is getting the whole thing to balance. I had the stars threaded and ready to go for weeks but kept putting off the final process of putting this thing together.

Tying your strings on the dowel rods (making sure they are roughly the same length) ended up being the easy part. Tie 3 or 4 knots to make sure the thread is secure. Once I was sure about the placement and length of the string, I trimmed the extra thread and put a tiny dot of hot glue on the knot to keep it secure.

For the long dowel rod, just tie one piece of thread to each end so it will look like a triangle when hung.

Five. Balance the mobile

After everything is tied, hang the mobile up on a nail in the wall (or something else to get it off your flat surface) and start to balance it. The dowel rods will tilt if its not balanced, so its just a process of shifting the thread to the left or right, depending on which way the rod tilts. 

Six. Hang the mobile


Take a very long piece of thread, loop it through the "triangle" you made with the thread and long dowel rod, and tie the end. Attach it to a ceiling hook where you want to hang the mobile and you're done! The mobile will move on its own (and your dog may bark at it from time to time), but since we used very thin thread, it will be very delicate and won't stick out like a sore thumb in the room.


This may seem a little confusing but I swear its pretty darn easy, aside from the balancing part, so feel free to email me or comment if you have any questions!

18

Cupcakes 101

A couple weeks ago I shared my rose cupcakes and I got a lot of awesome feedback from y'all asking for a tutorial, so I thought I'd lump it into a Cupcakes 101 kind of thing. You know I like to share tutorials for first timers, like our DIY headboard, curtains, and other random craft projects. So this is for those of you who want to get more into baking or want to make prettier cupcakes!

I know it is much easier to buy frosting at the store but making your own frosting will step it up a notch if you're up for it. I fully support boxed cake mix though, especially when you're pressed for time. 

What you will need
  • Wilton Frosting Tips. I used the 2D and 1M tips the most so I recommend starting out with those two.
  • Disposable Pastry Bags. Filling the bag can get a little rogue, so don't bother with the reusable bags.
  • Large Scoop (Not pictured). Use a scoop for even batter distribution for your cupcakes.
  • Greaseproof Cupcake Liners (Not pictured). These aren't totally necessary, but they do look better after baking your cupcakes than standard liners.  


Start out with a good, pipable frosting. I like this basic vanilla buttercream frosting, but I've also made blueberry buttercream and vanilla-almond frosting.

The key is blending your butter long enough that the color lightens and it becomes fluffy (about 5 minutes). For most recipes you also need about 4 cups of confectioners sugar to get the right consistency for piping, so buy the big ass bag! I swear by my Kitchenaid Stand Mixer which helps making frosting much easier, but you could use a hand mixer too.

Preparing your pastry bag

You don't need to bother with a coupler, just cut the end of your pastry bag and and throw in the tip.

There are basically two easy ways to fill your pastry bag. The first is to put the bag, tip side down, into a cup and fold the bag over the edges of the cup before filling. I personally like to hold the tip in one hand and fold the piping bag over itself, towards my arm. 

Please excuse my manhand... I was in between manicures!

Once your bag is filled, try to eliminate any air pockets and twist the bag above the frosting.

Rose Cupcake Tutorial 


  1. Prepare your frosting in your pastry bag with the Wilton 2D, 1M, or 2C tip (I used the 1M above).
  2. Starting in the center, pipe just a little bit and stop. 
  3. Then in a circular, continuous motion, pipe the frosting around the center working toward the outside of the cupcake. Try to end on a downward angle so you don't notice where the icing ended. 
So easy! It does take a couple tries to get it right so that gives you an excuse to eat the ugly cupcakes!

And in case you're wondering why the heck I made blue roses.. it's because I also wanted to try this hydrangea cupcake tutorial. Here's how they came out!

I used the Wilton 2D nozzle for the hydrangeas.

The trickiest part of the hydrangea icing is getting the white frosting in the center of the blue frosting. Make sure to push some of the frosting out before working on your cupcake because the tip of mine was mostly just blue frosting at first. 


Whenever you screw up, just blend the frosting with your spatula and top with sprinkles!

If anyone has questions let me know! Now... who is in the mood for cupcakes?!

29

Decor Love: Custom Acrylic Tray

Happy Hump Day! I hope you are all getting a dose of Spring like we are! Yesterday we were able to open all of the windows and get some vitamin D during Ruby's walk, and it felt so good.

After getting myself organized last night, I'm hoping I can get back into spring cleaning, organizing, and my mini office update this week. I'll just be working on a few smaller projects until we come back from Europe, so it will take a bit for it all to come together. Not that you'd expect it to be fast, given my slow progress on the master bedroom!

If you've seen my office inspiration on Pinterest, you know I have a thing for acrylic. I have a few smaller acrylic desk accessories, but I liked the idea of a tray to use as a catch-all. I get major anxiety when my desk is unorganized, so here's hoping this tray will help me keep my shit together!


This project is way too easy, especially if you have access to a laminator.

What you will need:

Acrylic Box Frame: $3 after 40% off coupon at Hobby Lobby
Scrapbook Paper: 25/cents each, I think. (I used 12x12 paper, but 8x10 also works)
Laminating for 2 pieces of Paper: $4 (I went to UPS)
Scissors, Exacto Knife, or Paper Cutter: Owned

Grand Total: $7.50

I noticed a similar (and really pretty) project on A Fabulous Fete, but I didn't want to bother with the spray paint, tape, and the clean up so I went with pretty scrapbook paper.

Craft stores have a bunch of different sizes in the box frames. It comes with a cheap cardboard insert... throw it out. Cut your paper to fit the inside of the box, making sure it is small enough that it will fit once it's laminated. Get your paper laminated, trim the edges, and place inside tray.

I didn't use anything to stick the paper to the tray, it's not really necessary. Also, please don't judge my tray styling, or lack thereof. I promise it will look prettier once I make some more progress!
 
Tape Dispenser

Cheap shadow box to pretty desk tray. I told you this was easy. Now that I see it written out, it's almost embarrassing!

Here it is with my other paper option, but I think I like the gold quatrefoil better. At least until I make my desk white!

If you want something with a monogram, you can get free printables here (though they may be a little small for this particular shadow box) or add an acrylic monogram like I did here.

It's very likely every room in our house will have one of these pretty trays, sooner or later. I mean... Bar tray. Vanity tray. So many possibilities!

24

Spring Cleaning: Photo Organization

Being the Type-A person that I am, I have a laundry list of spaces that I want to reorganize and clean, but who the heck has time for that?! I'll honestly be happy if I finish cleaning the house before we leave for Europe... and I've got 3 weeks to accomplish that mission.

Since we do have our trip coming up and I haven't learned how to resize any of my ginormous DSLR camera photos yet, I decided to start with the thousands of photos we have saved on our computer. Literally, there are thousands. Its amazing how much space these photos are eating up!

Does anyone else have photos from 2007 still on their computer? That's 7 years ago folks. Chew on that for a minute. It feels like eons ago, if you ask me.

On top of that, there were so many photos where I must have just kept snapping away. You know, like the ones of your dog that look almost identical, but you feel like you need to keep anyway? 

So my basic strategy to tackle this pain in the ass project was:
  1. Don't delete anything on accident
  2. Convert ridiculous folder names like "World's Largest Cocktail Party" to something along the lines of "2007 - Fall - College Football"
  3. Back up photos in 2 places, because who knows where those disks might end up after our next move
  4. Be cheap about it
Here is what I did to backup all of our photos before deleting them from our computer, which by the way is kind of scary. I triple-checked all of the photo disks to make sure the photos were there before hitting the delete button! Eek!

DVDs and Kraft Sleeves {Walmart}, Media Box

Delete, rename, and reorganize.
I liked the idea of renaming folders according to the year, season, and then a more specific description. The problem was we had photos from the same year and season in so many separate folders, it took forever to sort out. I also deleted a lot of photos in this step that were similar but unnecessary.

Back up to the cloud or your choice of online photo storage. 
I started looking into cloud storage, but there are so many options out there and everything seemed to be expensive once you bypass the free space limit. I ultimately decided on Picasa because as long as files are under a certain size, they don't count towards your total free space allowance.

Back up onto a disk.
I used DVD+R disks (I think you can also use DVD-R?) and it seemed to work well. You get more space on the blank DVDs than the CDs. Another option is to back up onto an external hard drive, but I had one of those die on me and I couldn't salvage anything from it, so I'm not a fan.

Label. 
This is really whatever works for you but I put the date in the top right corner and then more specifics on the left side. It got kind of wonky when it came to our iphone photos since this was the first backup in however long it has been.

Delete.
You can do it, it will be okay!

The downside to this virtual cleanup is that our house is still dusty... ugh. Now, if we could just fast forward to our trip so I can put some pretty Italy photos on our computer, that would be fabulous!

Does anyone else have tons of photos taking up space like I did? What is your system for backing up the photos?

20

Easy DIY Back-Tab Curtains

I never thought I'd be one of those curtain-making ladies. But, it happened.

I'm not going to lie, there were multiple injuries throughout this process between all the pinning and the ironing. After a few curse words and some spilled blood, I decided to stick it out and I'm really happy with the end result. Just don't look too close or you'll see my crooked stitching...


I've been working on our Master Bedroom redo for a long time. Like 7 months... yikes. I was having the hardest time finding curtains that I liked that didn't break the bank. Why are they so expensive?!

We have one big window in our bedroom, so I only needed 6 yards of fabric. For $30 total, I managed to get two customized curtain panels. Hallelujah.

You do need a sewing machine for this project though. If you're looking for a no-sew project, Stephanie from Newlyweds: North has a great tutorial on making curtains with hem tape and using curtain clips to hang them.

What you will need:
Sewing Machine = $0, owned
Thread = $0, owned
Clothing Iron = $0, owned
Pins = $0, owned
Curtain Rod = $0, previous renters left it behind so why bother?
Fabric = $30 ($4.99/per yard on sale. I used 6 yards for two panels of the Robert Allen Chic Fret fabric in Nickel. It is 45" wide, which just meant I couldn't hem the sides as much or I would lose some width. The 54" version is here)

Total Cost: $30 for two panels

Using our old back-tab Ikea curtains as a guide, I just started pinning, ironing, and sewing away. The first thing I did was cut my fabric in half so that I had two, 3-yard panels. Then, fold down the raw edges, pin, and iron them. This is the most boring part of the project, FYI. And painful, for me at least.

Once you stitch all of the sides, move on to the top and bottom hems. Measure both and pin, but do not sew the top hem yet. Only the bottom! We're going to sew the top after the tabs are pinned on.

4 inches at the top

6 inches at the bottom

(6 inches is probably a bit much, but since we're renters I don't know what our next place will be like... can you tell I'm hoping for high ceilings?)

Now, back to the slave labor. I made 12 tabs for the curtains, 6 per panel. You can use ribbon for this step, which would probably definitely be easier, but I didn't want to add to my costs.

I cut the fabric for my tabs to 5 inches by 3 inches. Fold the tabs in half with the right sides touching and stitch a hem along the longer, open side. Flip them right side out and iron.

Pin each tab on the top of your curtain panel with the top and bottom folded under (see below). Mine were a little over 6 inches apart.

Top panel in progress, using the bottom finished panel as a guide.

Sew along both the top and bottom edge of the tabs, all the way across your curtain panels. Iron the panels and hang!

It sounds like a lot but it's actually very easy. Just take your time... I made these over the course of a few days because I hated all of the pinning and ironing. The first panel is slow going because you need to figure out all of your measurements, but the second was so much easier and I think I finished that one in about 20 minutes!


I drove myself crazy trying to photograph this window. The lighting is terrible since its a huge room with only 1 window and lets be honest, I'm not so hot with my camera yet either.

I meant to get this up for y'all yesterday so it looks like you'll be getting an extra dose of me next week. Woo! Hope this inspires someone to DIY some curtains!

26

DIY Upholstered Headboard

First, thank you all for your comments on the progress we've made with our master bedroom redo! I say that like my husband was all about this project... ha! I actually think he is coming around to the idea of making things ourselves though, he was pretty shocked when I told him this headboard cost a grand total of $110! And brace yourselves because this post is picture heavy.

You can see the updated tutorial with much prettier photos and a diagram of the headboard dimensions here!


And now back to the old iPhone photos... 

I had very specific requirements in mind for our headboard, which is why I ultimately decided to forgo the logical decision of purchasing a headboard and attempting to make one on my own.  Of course, as an overachiever a beginner DIY-er, I had to challenge myself. You can see my inspiration here, but the one headboard that really stuck with me is the Z Gallerie 'Grayson Bed' which retails at about $1,200.

Obviously that was not happening. I didn't get the bed frame I wanted but I'm okay with that because I managed to tick all of my other boxes for a headboard:
  1. Grey, velvet-like fabric
  2. Taller than most headboards so it will be noticed with all of our pillows arranged
  3. Nailhead trim
  4. Fabric all the way down the sides, onto the legs of the frame so that if you happen to see the side, it won't look ugly
  5. Make sure the legs can be screwed into the bed frame if needed (we haven't done that yet, it seems to be holding well with the frame pushed up against it)
  6. For the love of God, it cannot look homemade
Note: If you are considering making your own headboard, please save yourself the headaches, cursing, and staple gun injuries by choosing a more simple shape or even avoiding velvet for your fabric. More on that later...

There are tons and tons of upholstered headboard tutorials out there, but this tutorial from Sara at Running from the Law was by far the best. She has lots of great pictures and seems better than me at using the jig saw, so feel free to check that out if this tutorial blows. ha!

What you need:

1 (23/32 x 4 x 8) piece of Plywood, uncut: $25
1 (1 x 6 x 12) piece of lumber, we used Top Choice from Lowes and had it cut in half: $12
Staple Gun: Own
1 pack of 3/8" (10mm) Staples: Own
Hi-Loft Batting in Twin Size: $16 (with coupon at Joann's)
Twin Foam Mattress Pad: $10 from Walmart
1 50-pack of 1 1/4" Wood Screws: $6
Spray Adhesive: $5 (I used Aleene's Tacky Spray from Joann's with a coup)
Nail Head Trim: $11 (with coupon at Joann's)
Rubber Mallet: Own (randomly found this in my car's emergency kit?)
Jig Saw: Borrowed
Circular Saw: Didn't actually use one, but if you have one it would be helpful
Fabric: $25 (I used one 55" x 98" "Sanela" Ikea curtain panel)

Total: $110 (or $118 if you count the 2 x 6 x 12 lumber the guys talked me into buying because they weren't understanding my design plan... don't be intimidated at Lowes, ladies!)

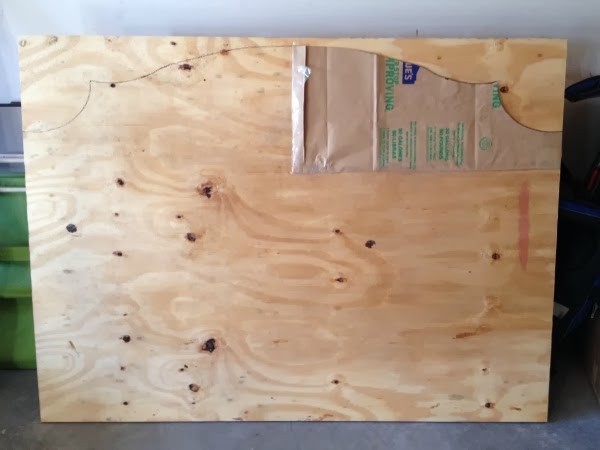
First we cut the plywood down to the size I wanted it with our Queen bed, which was 63" wide by 65" tall (at the tallest point).

Next, I already had the shape of my headboard in mind so we used a paper bag to make a stencil. I traced the left side, then flipped over the stencil and did the same on the right side. You could also use a compass but my shape was a bit too advanced for a compass, of course!


Cut your headboard shape, and remember... safety first!

He's going to hate me for posting that picture, but I did warn him. Also, I forgot to take pictures of us cutting the headboard to shape...  must have been distracted from my husband's sexiness in those glasses....

Because I knew I would be upholstering this and the nailheads would need something to hammer into, I decided to follow Sara's tutorial and frame the headboard with the piece of lumber (as the legs) and the left over plywood for the top of the headboard and leg reinforcements. Does that even make sense?! Your legs can be as long as you want them to be, but ours stick out 21 inches from the bottom of the headboard.

Please ignore the mess in our garage!
That part was tricky because the leftover plywood wasn't the length of the headboard. We ended up having to piece it together and even though there are a few tiny gaps, those won't matter in the long run.

We then attached the legs and the frame pieces to the plywood with the wood screws, about every 6-8 inches.


Progress!


You can see in this photo that the legs have extra pieces of plywood on the backside so that everything is flush with the headboard. We decided not to trim them to match the 1 x 6, too much effort and no one will know once you upholster it. 

Next, cut your foam padding to fit within the frame you just completed before spraying the plywood with adhesive and sticking the foam to the board.


Easy peasy. Next I put the batting underneath of the headboard and started stapling.

I go a little overboard with the staple gun, y'all. It totally wasn't necessary to use an entire pack of staples but I did and I'm not ashamed of it. The curves of the headboard were a bitch and the only solution I had after finishing a bottle of wine was going staple-crazy. The last thing I wanted was to finally reveal the headboard I spent hours on and it have a bunch of puckering and bunching.

Before moving on, trim all of the excess batting.


Once I got to the actual fabric, it was basically the same process as the batting. However, this velvet fabric was out to get me and I am so thankful Steve helped because my hand was sore from stapling at this point. It also helps to have one person pulling the fabric, and the other stapling.

I worked my way around the headboard, only doing a few staples on the top, then bottom, then the sides. I continued this process, saving the curves and most of the top of the headboard for last.

It helps to cut the fabric in 'V' shapes in the curved portions to minimize puckering. But let me tell you, this fabric refused to cooperate. I almost cut it too far to where you would see it ripping onto the side of the headboard. AH!

Terrible, terrible curves! At least we won't see the back!
I used leftover batting and fabric for the legs and did those the same exact way.

It was getting dark at this point

Applying the nailhead trim was actually easier than I imagined. You only have to nail every 5th nail into the wood and its flexible enough that you can bend it however you need it for the curved portions. The trick is keeping it straight, so I used my leveler because it was the perfect width from the edge of the headboard.


My first attempt at keeping the nailhead trim straight was using painter's tape, but when I pulled it off some of my super high quality Ikea velvet came out. I panicked at the time, but you don't notice it now unless you look really close.

I actually got into a rhythm when doing the nailhead trim and it only took about 20 minutes.

Finally, sit your headboard up on its legs and admire your work! Then, pop open another bottle of wine or some pumpkin beer and put your feet up!


For more of the finished product, visit here. I've actually gotten a lot accomplished since then so hopefully the final reveal will be soon!

Do any of you think you'll give it a shot? If you have any questions, let me know! I know it looks a bit complicated but its totally doable with some patience and in my case, wine. 


Savvy Southern Style
29

Fall Mantel & Felt Foliage Garland

Now that it's officially Fall I thought I'd finally share some of the spaces in our house that I've been decking out in Fall colors! First up on the Fall house tour: our fireplace mantel.

I'm such a traditionalist when it comes to decorating for the holidays, so it's hard for me break from the pretty Fall colors and natural accents. You'll notice I'm the same way with Christmas decorations in a couple months! Also, in case you're new here, I'm waiting on Santa for my big girl camera so I have to work with crappy morning lighting and iPhone pictures for now!

Ruby's toys photobombed this pic! ha!
When we were looking for a house to rent, I was really pulling for something with a fireplace so that I could have a mantel to decorate for the holidays. It makes it feel more like home to me. My husband didn't really get it at first, but now he feels the same way. At least he says he does... in which case I've trained him well.


Of course I had to have a monogram... this one was purchased from Life's a Stitch on Etsy. You can't really tell in these photos but the monogram came cracked in the middle of the M. Luckily the tape held this one together long enough for me to hang it and take some photos until the replacement comes!


The candlesticks are from Ikea and were already a part of our mantel decor. The battery operated candles are from Hobby Lobby and the orange vase is from TJ Maxx. I already had the branches in a different arrangement, so I just re-purposed them in the vase.


After sharing this Halloween bunting tutorial and tissue paper garland, I'm sure you can all tell by now that I love bunting or basically any kind of garland. I've seen a lot of adorable felt foliage garlands popping up on Etsy and considering felt is so cheap, I thought I could make it myself. See the end of this post for details on how I made it!


This basket is from Target. We keep a couple blankets in there as well as our Pittsburgh Steelers Terrible Towel. We've been throwing that one at the TV a lot lately...


This pillow is my first attempt at making a pillow since that same 7th grade home economics class I mentioned here. By no means is this pillow perfect, which is why I didn't do a tutorial. I was too lazy to change the bobbin so I handstitched the felt leaves on. Its acceptable enough for the fireplace decor as long as you don't look too close...


All in all, just adding a few fall touches to the fireplace cost me about $25, including the pumpkins. I didn't count the monogram since I'll be using that for other holiday decor...I think it would look perfect in the center of a Christmas wreath with a big plaid bow!

I mentioned earlier that I'm pretty new to the sewing machine and I actually couldn't find a good tutorial on how to make the felt foliage garland so I just had to wing it! This is a classic case of do as a say, not as I do :)


I bought 2 pieces of felt per color, each at 34 cents (plus a 15% off coupon) and since I only used one piece of felt per color this ended up costing me a little over $1! I googled "fall leaves" and found a free printable with various leaf shapes so I pinned those onto the felt and started cutting. That was probably the most annoying part of this project!

After your leaves are cut, pick a neutral color of thread and start sewing! I used a standard stitch (not even sure if that is the right wording.. see how new I am at this? ha!) and backstitched on the first and last leaves to keep the thread in place.

The major lesson I learned doing this without a tutorial was to stitch towards the top of your leaves. I sewed in the middle and because some of the leaves are top heavy, they flip over even though I wanted them facing the other way. I also wasn't entirely consistent with the space in between each leaf so just keep that in mind. Other than that, its super simple and cheap which is perfect in my book!

If you're new to Home Sweet Ruby, don't forget to check out my 5 favorite Fall DIY projects and my $16 Fall wreath!

Anyone else decorating with the traditional Fall colors or are you mixing it up a bit?!

Linking up with Thrifty Decor Chick

22
Powered by Blogger.